And me goes Apple… Again!
 Long time I doubted that I’ll ever use a Mac beside my Windows
environment but sometimes something new has to come, espe-
cially when new knowledge has to be built. So since I already
have made my experiences with Linux (and it’s kinks), well…
The time has come for me to gain experience in OS X Yosemite (OS X 10.10).
My basis for this is a brand new shiny MacBook Pro Retina 15 Mid 2014. Since I do not intend to play heavy games on it, the version without a dedicated G750M is at start. The main advantage: longer battery runtimes and less fan noise. a really fast SSD (750 and 650 MB/s read and write speed speak a clear language here) and 16 GB RAM should be enough to fire even more challenging Task at this really flat notebook. The Core i7 processor has 4 cores and 8 threads which are fired with 2.2 GHz and 2.5GHz in turbo mode. That’s pretty much power I guess!
While most people say that Apple’s notebooks are extemely pricey, yes, a price tag of 1800 CHF isn’t a bargain (although there was an additional rebate for the electronics market’s opening), but what the hey, other Ultrabooks also cost a quite a lot.
So let’s start with the unpacking.
The Packaging:
The package is classic white. The MacBook only is visible. Nothing more. Stylish minimalistic like Apple! When you unfurl the package, then you see the notebook on top. A small power adapter and a power cable / power plug is all additional equipment you’ll find in the package. But that’s all you need.
The MacBook
When you lift the exactly 2kg device out of the box and unwrap the transparent plastic foil, then you hold a really worthy piece of aluminum with technics in your hands. What’s astounding is the fact that besides the powerful hardware and the display lid, the notebook doesn’t rais above 20mm in height. And for those who fear a certain bendgate, believe me, I never had such a sturdy piece of notebook in my hands before. All the notebooks that passed through my hands for sure had some sturdiness and were not much subject to bending but they were either ways thicker or heavier or both. Apple’s UniBody design and aluminum carving technics give the MacBook the elegant, sleek, yet sturdy and stable design. Something one would expect at such a high price tag.
The Retina display
Okay, nowadays, displays with up to 4k are built into notebooks and so the 3K display (2880×1800) in the MacBook seems a little retarded but hey, once you fire up OSX Yosemite, even these doubts are gone. A perfect clear and bright display, followed by a very good color performance, make you want to work with your new gadget. The brightness ranges from dimmed to extremely bright and it can also adapt to your surrounding’s lighting. Glyphs are extremely clear to read and the interface looks modern. Although, both Apple and Microsoft use a flat UI design, Yosemite still uses a translucent window style making the design less boring than in Windows 8/8.1. Still keep in mind that older Apps that aren’t made ready for Retina, look somewhat briky as their resolution is scaled the factor 2 (1440×900). But newer Apps look fresh, sharp and modern.
OS X Yosemite
The OS itself is preinstalled and (if you need it) additionally stored on a ROM for factory reset. That’s the reason why you’ll never need any recovery media. Simply fire up the HDD management program and when your Mac is hosed for whatever reason, have the Management utility cleansed your HDD, installed the OS (had to do it several times – beginner’s experience) in about 40 Minutes and TADA there you go with a squeaky clean fresh OS X Yosemite.
Initial Setup
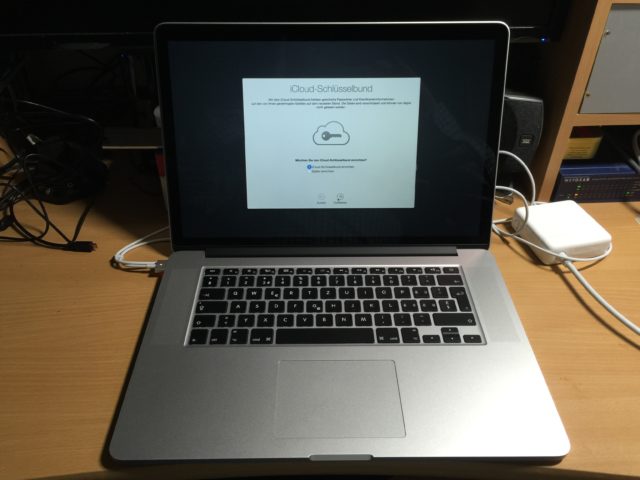
As you would expect it, the first time you switch on your Mac, you’ll be prompted to enter some basic information and either create an iCloud account or sign on to an existing one. The reason for this is that if you own an iDevice already, the Mac is synchronizing your address book and all your data that is stored on your iCloud account and suitable for your Mac. Really love that smooth way to set up an OS.
First steps
When you’re logged on, you’ll find yourself on your new desktop which consists of the menu bar on the top and the launcher Bar at the bottom. No other icons are on the desktop (except when you mount external mountpoints or media) yet. so what to do from here on? (Please keep in mind that the screenshots used beyond this point are third party pics and rights belong to their respective owners!)
What Windows refers to “Desktop” is simply called “Finder” on OS X. While every window in Windows has it’s own menu bar, OS X uses the very same menu Bar and adapts it to the app currently focused on. So when you ask yourself to what App the given commands rely to, simply look at the bold text right of the Apple logo and you’re good to go.
Well, for the first thing you’ll notice the notification center that is already on your iDevice when you sweep down. The similarity is given although the widgets to display in have to be compatible with your Mac. To have the Notification center appear, simply place the mouse cursor to the very right of the screen or click on the icon right of the magnifying glass.
Looks nice and if you don’t need the information any longer, it vanishes back into the right border. Nifty and useful, I say!
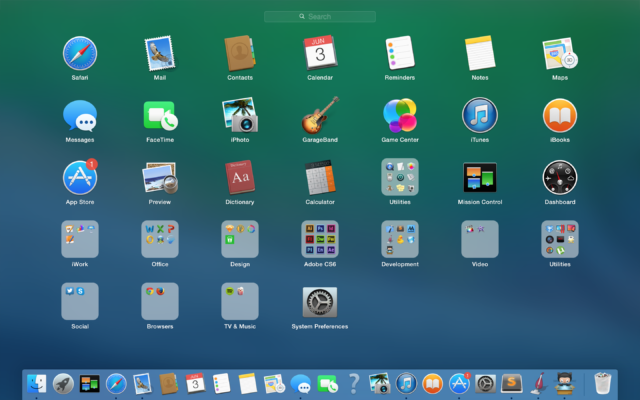
Notice the Icon right to the Mac Face? That’s the Dashboard or, let’s say, the place where all your Apps come together. Users of iDevices may recognize a similarity to their Apps screen.
Apps you install from the AppStore (Yes, even your Mac has it!) also go there. Programs you install from the internet (usually recognizable as .pkg or .dmg) should also go there or you can spot them using the Finder and click on the Applications entry in the favourites.
Preparations
There’s nothing much to prepare to start right of working with your new Mac. If you’re into graphics, there are several tools in the App Store or you may want to go for Adobe products. Note that you’ll have to pay for a CC monthly license that can cost up to 120 CHF/month depending on what programs you intend to use. the least you have to pay, is 32.80 CHF and is valid for a single product only. So as long as you’re not into serious moneymaking off the programs (better say the works you create with them), you’ll better stick to one-pay solutions from the App Store instead.
Safari comes with a lot of integrated technics already but if you need to used Flash-based sites, you’ll have to install the Adobe Flash Player for Mac (which is a breeze). Since Safari doesn’t come with a powerful ad blocker, you’ll be seeing them nasty critters until you shoot AdBlock Plus at them which is also available for the Mac.
Now your Mac is ready for the first steps.
Input
Let’s face it. A good notebook has to come with a good keyboard and trackpad. You’ll use it as long as you don’t have an external keyboard or mouse attached to your MacBook. So if you think, that due to it’s sleekness, the haptics are going down the drain, let me assure you that the keyboard has avery tactile yet comfortable and quiet typing experience. The background lighting (yes, Apple still managed to squeeze these little glow worms, called LED below the keys) can be set individually from good brightness to dimmed to always match your needs. The chiclet keys measure the standard 15x15mm grid. So fast and relaxed typing should not be an issue. Alone the arrow keys are squeezed and you don’t have a numeric keypad. Since there’s not much room for the keyboard to bend down, you’ll have a very stable typing experience which again underlines the excellent material quality, Apple puts it’s efforts in!
The Trackpad has it’s glassy touch as you know it from the magic trackpad that’s also sold as separate gadget for those who own a normal Mac. the size is well-dimensioned and the speed is already set to good way vs. speed and exactness. The tactile yet not too loud clicking of either the left or right corner hat represent your left and right mouse key is also very-well crafted. No bending or lumpy click behavior can be spotted or felt. That’s how trackpads have to be!
Connectivity
Okay, we have a tough call here. Since the body of the MacBook doesn’t give much room for connectors, these are the only ones to be found:
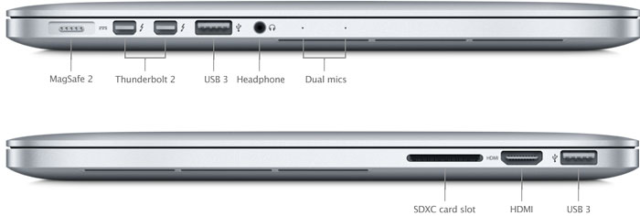
On the left we have the MagSafe2-Power Connector, 2 Thunderbolt V2 connectors, one USB3.0 connector and a 3.5mm audio jack.
The right side spots an SD card slot (SDXC and UHS-II ready, that is!), an HDMI-Connector and another USB3.0 Connector.
For those, who wonder, what an SDXC-UHS-II card looks like:
Okay, that’s not much, if you compare connectivity on other behemoths of notebooks but what the hey, there’s all the essentials you need. And if you ask about the Ethernet port, okay, yes, this one is missing, yeah, because WLAN isn’t always available. But there are adapters you can use. Either you use an Ethernet-2-Lightning-Adapter or you can still stick to the Ethernet-2-USB3-Adapter that will give you GBit speed.
Wireless connectivity
Okay, so let’s have a look on the invisible cables here  – Yes, the MacBook comes with a really fast ac-WLAN that provides up to 1300 Mbit/s (as it has three antenna connectors). The Bluetooth connection is made via a V4.0 Bluetooth LowEnergyConsumption Profile. Modern and all you need here. Infrared is so 80’s these days :). NFC isn’t deployed but with all this Aluminum, well, I guess it wouldn’t work that well anyways!
Battery and power
The battery consists of 3 cells holding 8520mAh and delivering 11.1V. (According to the Battery Info) -> Thus the battery has 95Wh. Your Power adapter is delivering 20V and putting 85W of power to your MagSafe connector. so you’re facing 4.125A at the MagSafe connector side. Since the battery inside has three cells and delivering 11.1V I wonder if some transformation is done as the power adapter is delivering 20V. Well nevermind, the battery runtime is fine. Fully loaded, you can expect roughly 2.5h of runtime. 8h with average load (such as web surfing) and when put to standby, you’ll face 30 days of standby time (according to what Apple writes).
Sound
When it comes to sound, well, many of us expect a really well-sounding speaker. But without volume you simply can’t expect cinema sound. But let me assure you that the MacBook does a very good job here. The sound is crisp and some bass can also be spotted while the sound level is really good for this small size!
Noise
The only noise, the MacBook Pro is emitting, comes from the fans that cool down the processor. So you won’t hear these unless you really torture the CPU and GPU. The SSD itself is silent. No surprise here! During usage I wasn’t able to determine any annoying coil tweeting or other disturbing noises. Another indicator that Apple simply wants the best components put into their devices.
Camera
Okay, the Camera is a standard 720p model as you know it from other notebooks, too. But since Apple always tends to have the better modules built in, you can expect a rather good quality here. First experiments have proven me right. I will test it some more and post the pictures taken with the upcoming post.
First conclusion:
So far these are my first impressions on my new MacBook Pro. As soon as I have some more information on Must-Haves and other stuff to know about OS X and the Mac, I’ll post them here as a sequel to this post. So stay tuned!
Oh and one more thing: Thanks to The Pianoman and Rosiv who gave me First-User-tips that helped me a lot.
Hardware verdict:
| Case | ★ ★ ★ ★ ★+★ |
| Input | ★ ★ ★ ★ ★ |
| Sound | ★ ★ ★ ★ |
| Noise | ★ ★ ★ ★ ★ |
| Battery | ★ ★ ★ ★ |
| Camera | ★ ★ ★ |
| Connectivity | ★ ★ ★ ★ ★ |
| Speed | ★ ★ ★ ★ |
| Gaming | ★ ★ ★ |
| Display | ★ ★ ★ ★ ★+★ |
| Overall | ★ ★ ★ ★ ★ |
Apple once again has declared war on the upcoming ultrabook generation. No need of a touchscreen, yet brilliant display, crammed into a small aluminum body that perfectly matches with the rest makes this notebook again a masterpiece. If you can afford it, make this your preference to other notebooks as long as you do not rely on Windows. You won’t be disappointed!


 Users Today : 582
 Users Yesterday : 581
 This Month : 3927
 This Year : 46047
 Total Users : 1102530
 Views Today : 2106
 Total views : 4536841


Leave a comment